Agentic System Patterns That Increased Accuracy by 50% (And What They Cost)
Agentic systems are already being deployed for complex tasks: building software, conducting research, analyzing data, and automating workflows. But as they move from prototypes to production, teams face a fundamental question: how do you build an agentic system that reliably handles any task?
The answer isn’t just about better prompts or more sophisticated models. It’s about understanding the trade-offs between three critical dimensions:
- Cost - API calls, compute resources, infrastructure
- Latency - Time to complete a task, user experience
- Accuracy - Correctness, reliability, handling edge cases
The truth is that most techniques that improve accuracy also increase cost and latency. Multi-step reasoning, parallel verification, self-correction loops. They all make your system better, but at a price. The key is knowing when to pay that price and how to optimize within your constraints.
This blog distills lessons learned from building agentic systems in production. Each tip includes concrete impact metrics on cost, latency, and accuracy, along with guidance on when to apply it. By the end, you will have a framework for making informed decisions about your agentic system architecture.
Note: I was inspired to write this after recently using Blackbox AI for several coding tasks. Observing how their autonomous agent handled planning, execution, and self-correction a now common pattern in agentic systems made me want to document the underlying patterns that make agentic systems work in production.
Let’s get into it.
The Rubric: Cost, Latency, and Accuracy
Every decision you make when building an agentic system impacts these three dimensions. Understanding how to measure and balance them is crucial for production systems.
Cost
What it is: The total financial expense of running your agentic system.
Components:
- API costs - LLM API calls (input/output tokens), embedding APIs, vision APIs
- Compute costs - Server infrastructure, container orchestration, database queries
- Infrastructure costs - Storage, networking, monitoring tools
- Data costs - Retrieval systems, vector databases, data processing pipelines
How to measure: Track per-request costs, monthly spend, and cost per successful task completion. Costs vary significantly based on model choice, context length, number of API calls, and infrastructure requirements.
Latency
What it is: The time from when a user submits a task until they receive the final result.
Components:
- LLM inference time - Model generation latency (varies by model and context length)
- Tool execution time - API calls, database queries, code execution
- Network latency - API round trips, data retrieval
- Sequential processing - Waiting for previous steps to complete
How to measure: Track end-to-end latency (p50, p95, p99), time per step, and user-perceived wait time. Acceptable latency depends on your use case—real-time systems have stricter requirements than batch processing.
Accuracy
What it is: The correctness and reliability of your system’s outputs.
Components:
- Task completion rate - Percentage of tasks successfully completed
- Output quality - Correctness of results, handling edge cases
- Error rate - Hallucinations, incorrect tool usage, failed executions
- Consistency - Reproducibility across similar inputs
How to measure: Use task-specific metrics (code correctness, answer accuracy), human evaluation, automated tests, and error tracking. Target accuracy depends on your domain and the cost of errors.
Accuracy = f(Cost, Latency)
Decision Framework: When to Use What
Before diving into specific techniques, it’s helpful to have a framework for deciding which techniques to apply based on your constraints and requirements.
Step 1: Define Your Constraints
Start by clearly defining your constraints:
- Cost budget: What’s your cost per request or monthly budget?
- Latency requirements: What’s your acceptable response time? (real-time <2s, near-real-time <10s, batch can be minutes/hours)
- Accuracy requirements: What accuracy level do you need? (depends on error cost: high-stakes needs 95%+, prototyping can tolerate 70-80%)
Step 2: Assess Task Complexity
Evaluate your task:
- Simple tasks: Single-step, straightforward operations (classification, extraction, simple API calls)
- Moderate complexity: Multi-step tasks with clear dependencies (data processing pipelines, multi-tool workflows)
- High complexity: Tasks requiring reasoning, planning, or handling uncertainty (research, code generation, complex problem-solving)
Step 3: Choose Your Starting Point
For simple tasks:
- Start with Chain of Thought (if reasoning is needed)
- Skip Planner-Executor (overhead not justified)
- Skip Verifier Agents (unless high-stakes)
- Consider File System for observability
For moderate complexity:
- Use Planner-Executor Architecture
- Add Chain of Thought for reasoning-heavy steps
- Use File System for state management
- Consider Verifier Agents for critical decision points
For high complexity:
- Use Planner-Executor Architecture (essential)
- Add Verifier Agents (plan verification + key milestones)
- Consider Multiple Agents for critical outputs
- Always use File System for state and debugging
- Chain of Thought throughout
Step 4: Iterate Based on Results
- Measure your baseline (cost, latency, accuracy)
- Apply techniques one at a time
- Evaluate impact on all three dimensions
- Optimize by removing techniques that don’t provide sufficient value
Remember to start simple, measure everything, and add complexity only when it provides clear value.
Production Techniques
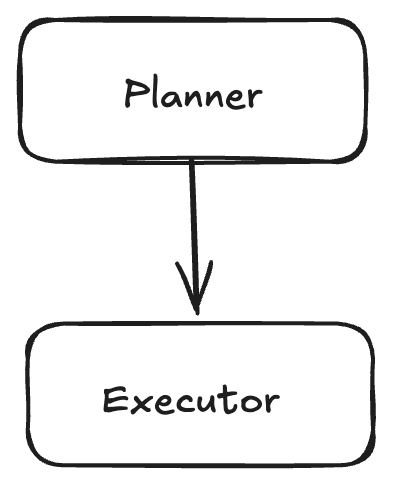
1. The Planner-Executor Architecture
What it is: Decompose your agent into two specialized components: a planner that breaks down tasks into sub-tasks, and an executor that carries out those sub-tasks.
How it works:
- Planner Agent: Takes the high-level task and generates a structured plan with sub-tasks, tool selections, and parameters
- Executor Agent: Receives the plan and executes each step sequentially, using the specified tools
- Alternative: Use a single agent that generates a plan (with tool choices and params) in one call, then executes it
Example:
Task: "Build a REST API for user authentication"
-> Planner Agent generates:
1. Create database schema (tool: sql_executor)
2. Implement login endpoint (tool: code_generator)
3. Add password hashing (tool: code_generator)
4. Write tests (tool: test_generator)
-> Executor Agent runs each step
Real-world example: Blackbox AI’s Autonomous Coding Agent uses this pattern for code generation. It interprets the goal, turns it into an ordered plan of file edits, then executes that plan by writing and modifying code. The explicit plan -> execute split helps it handle multi-step tasks more reliably.
Impact on Rubric:
- Cost: +1.5-2x (additional LLM call for planning, but more efficient execution)
- Latency: +500ms-2s (planning overhead, but better task completion reduces retries)
- Accuracy: +20-30% (explicit planning reduces errors, better tool selection)
When to use:
- Complex, multi-step tasks that benefit from explicit planning
- Tasks where tool selection is critical
- When you need explainable, debuggable workflows
- Avoid for simple, single-step tasks where the overhead is not justified
2. Chain of Thought Prompting
What it is: A prompt engineering technique that asks the model to show its reasoning process before arriving at the final answer.
How it works:
- Add instructions like “Think step by step” or “Show your reasoning”
- Provide few-shot examples with explicit reasoning chains
- The model generates intermediate reasoning steps, then the final answer
- Works especially well when combined with few-shot examples
Example:
Query: "What's the best database for this use case? Think step by step"

What are the requirements? (scale, consistency, latency)
What are the trade-offs?
Which databases match these requirements?
Final recommendation: [answer]
Real-world example: This pattern is common in production workflows like debugging and root-cause analysis, where intermediate reasoning reduces mistakes even if the final answer is short.
Impact on Rubric:
- Cost: +1.3-1.8x (30-80% more output tokens for reasoning steps)
- Latency: +200ms-1s (longer generation time due to more tokens)
- Accuracy: +15-25% (especially on complex reasoning tasks, math, logic)
When to use:
- Complex reasoning tasks (math, logic, multi-step problems)
- When you need to debug model thinking
- Tasks that benefit from explicit intermediate steps
- Avoid for simple classification or extraction tasks where reasoning overhead is not needed
Additional benefit: Chain of Thought improves robustness when switching between different models, as the reasoning steps make the process more transparent and debuggable.
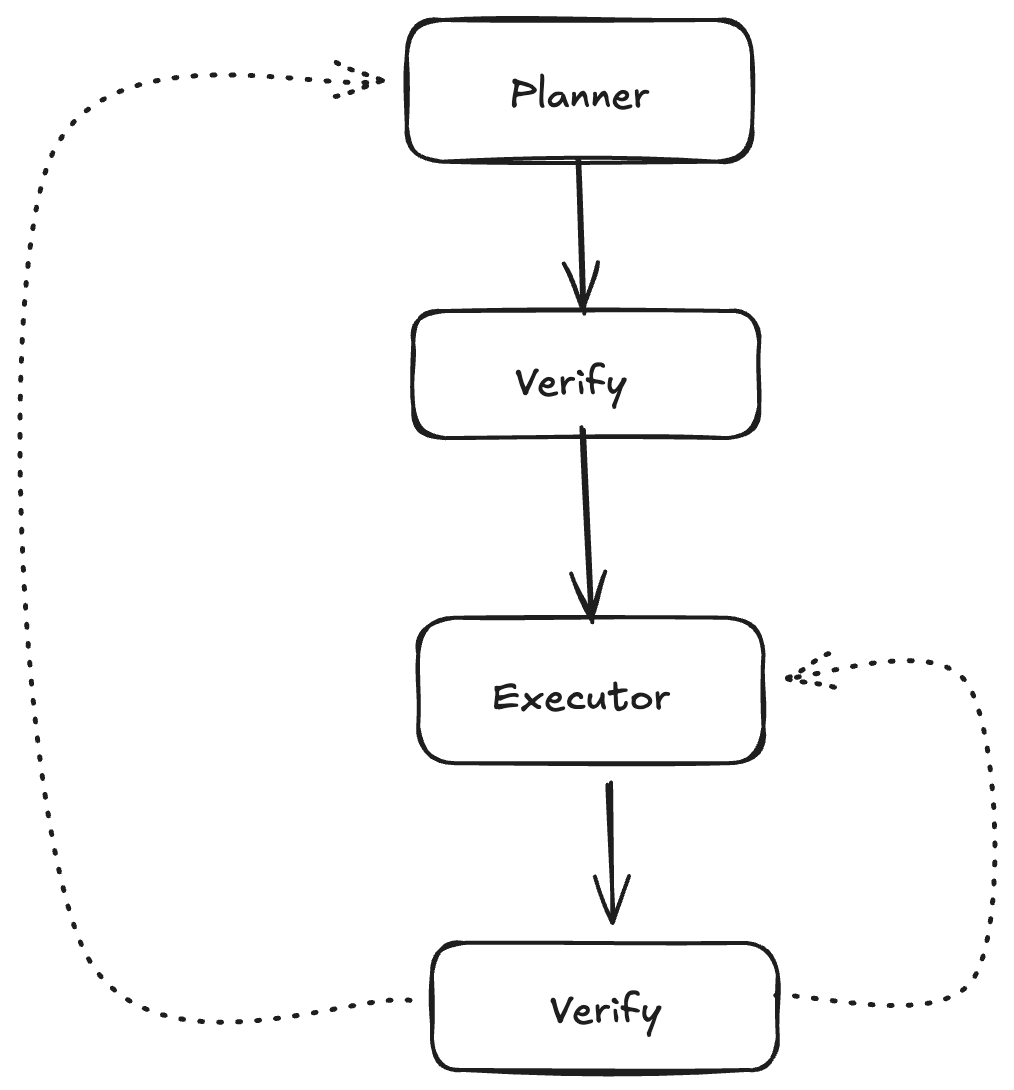
3. Strategic Use of Verifier Agents
What it is: Use a separate agent to verify plans or outputs and provide feedback for improvement.
How it works:
- Plan Verification: Verifier reviews the planner’s output before execution, provides feedback, planner refines
- Output Verification: After each execution step, verifier checks the result, provides feedback, planner adjusts remaining steps
- Don’t verify every LLM call. Be strategic about where verification adds the most value
Example:
Planner generates plan -> Verifier checks:
- Are all steps necessary?
- Are tools correctly selected?
- Are there missing steps?
-> Feedback to planner -> Refined plan -> Execute
Real-world example: Blackbox AI’s Autonomous Agent uses self-correction as a built-in verification mechanism. After generating code, it automatically tests and verifies changes work as expected. If errors occur, it analyzes problems, debugs the code, and tries new approaches—essentially acting as its own verifier agent in a continuous loop. This self-correction continues until the task is complete, demonstrating how verification can be integrated directly into the execution cycle rather than as a separate step.
Impact on Rubric:
- Cost: +1.5-3x (additional LLM calls for verification, varies by frequency)
- Latency: +1-3s per verification step (model call + feedback loop)
- Accuracy: +25-40% (catches errors early, improves plan quality)
When to use:
- High-stakes tasks where errors are costly
- Complex plans that benefit from review
- When you can’t afford failed executions
- Avoid verifying every single step. Focus on critical decision points or final outputs
Best practices:
- Verify the plan once before execution (catches issues early)
- Verify outputs at key milestones, not every step
- Use lightweight verification for simple checks, full verification for complex decisions
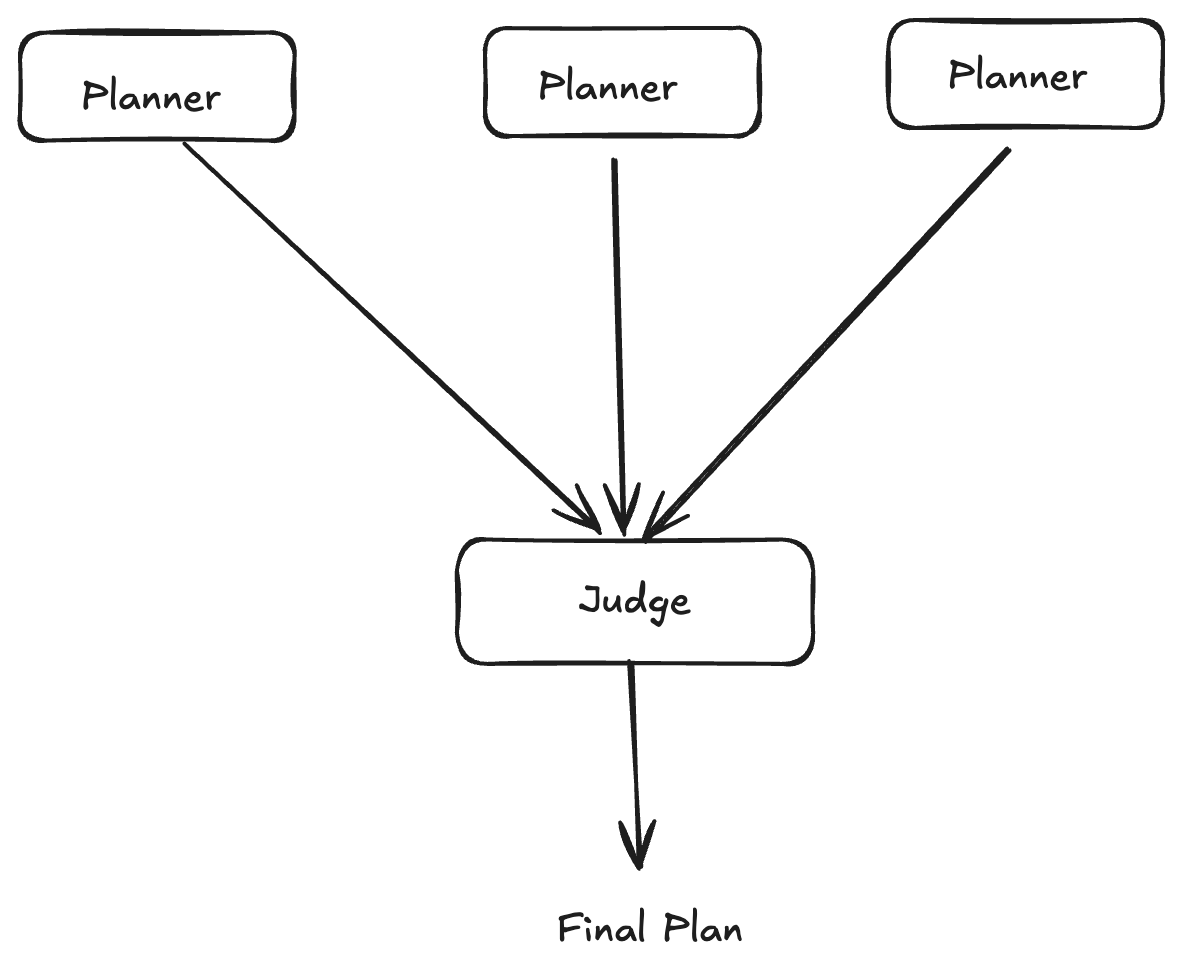
4. Parallelize with Multiple Agents
What it is: Run multiple agents in parallel to generate plans or outputs, then use a judge/aggregator to select or combine the best results.
How it works:
- Plan Generation: 2 or more agents with different configurations generate plans in parallel, judge selects best
- Output Generation: Multiple agents generate final outputs in parallel, judge picks best based on quality, efficiency, error-proneness
- Judge Agent: Evaluates outputs using a rubric (quality, correctness, efficiency)
Real-world example: Blackbox AI uses this approach for code generation tasks. Users select 2-5 different models (Claude, Codex, Gemini, or Blackbox) to work on the same task in parallel. Each agent generates code in separate Git branches, and an AI judge evaluates all outputs based on quality, efficiency, and error-proneness to select the best implementation. The parallel execution means latency stays roughly the same as a single agent, while accuracy improves significantly through the ensemble effect.
Impact on Rubric:
- Cost: +2-5x (N agents × cost per agent + judge cost)
- Latency: +0-2s (parallel execution means latency ≈ slowest agent, but judge adds overhead)
- Accuracy: +30-50% (ensemble effect, best-of-N selection)
When to use:
- Critical tasks where maximum accuracy is required
- When you have budget for parallel execution
- Tasks with high variance in output quality
- Avoid for simple tasks or when cost/latency constraints are tight
Optimization tip: Start with 2-3 agents. Diminishing returns kick in quickly. 5 agents might only be 5-10% better than 3, but cost 67% more.
5. Maintain State with File System
What it is: Use a file system (markdown, text files, or structured formats) to maintain state, track progress, and provide context across agent calls.
How it works:
- Plan Storage: Write the initial plan to a file as a todo list
- Progress Tracking: Log each tool call, its parameters, and results
- Context Building: Use the file as context for subsequent agent calls, maintaining awareness of what’s been done
- State Persistence: File survives across agent invocations, enabling resumable workflows
Real-world example: Claude Code uses this approach extensively. It maintains persistent state through markdown files like CLAUDE.md (project rules and system prompts), NOW.md (current work state), progress.md (execution logs), and task_plan.md (upcoming tasks). These files persist across sessions, allowing Claude to resume work, maintain context about what’s been completed, and avoid repeating previous steps. The file system acts as the agent’s memory, with each file serving a specific purpose in maintaining long-term state and project continuity.
Example:
Task: Build authentication API

Plan
- [x] Create database schema
- [x] Implement login endpoint
- [ ] Add password hashing
- [ ] Write tests

Execution Log

Step 1: Database Schema
Tool: sql_executor
Input: CREATE TABLE users...
Output: Table created successfully

Step 2: Login Endpoint
Tool: code_generator
Input: Generate Flask login route
Output: [code generated]
Impact on Rubric:
- Cost: +5-15% (slightly longer context windows, but reduces redundant work)
- Latency: +50-200ms (file I/O overhead, but enables better context)
- Accuracy: +15-25% (better context awareness, reduces repeated mistakes, enables recovery)
When to use:
- Long-running, multi-step tasks
- When you need resumable workflows
- Tasks where context from previous steps is critical
- Debugging and observability needs
- Always recommended for production systems. The overhead is minimal and benefits are significant
Additional benefits:
- Enables human-in-the-loop workflows (humans can review/edit the file)
- Provides audit trails and debugging information
- Allows partial execution and recovery from failures
Conclusion
Building production ready agentic systems requires balancing cost, latency, and accuracy. The techniques we’ve covered like Planner-Executor Architecture, Chain of Thought, Verifier Agents, Multiple Agents, and File System state management are proven building blocks that improve accuracy at the cost of higher latency and expense.
Key takeaways:
-
Start with the rubric: Always measure cost, latency, and accuracy. You can’t optimize what you don’t measure.
-
Begin simple: Start with the minimum viable architecture. Add complexity only when it provides clear value.
-
Use the decision framework: Assess your constraints and task complexity to choose the right techniques.
-
Combine strategically: Techniques work better together, but be mindful of cumulative costs. The Planner-Executor Architecture is usually the best first addition.
-
File System is almost always worth it: The overhead is minimal, and the benefits (observability, debugging, resumability) are significant.
-
Iterate and measure: Production systems evolve. Continuously measure your metrics and adjust your architecture based on real-world performance.
The techniques here form a solid foundation, but production systems have additional concerns: error handling, retry logic, rate limiting, monitoring, security, and scalability. These will be covered in Part 2, where we will dive deeper into operational concerns, optimization strategies, and advanced patterns.
For now, start with these five techniques, measure everything, and iterate based on your specific constraints and requirements. The framework is your guide, but your metrics will be your truth.
If you found this interesting, I would love to hear your thoughts. Share it on Twitter, LinkedIn, or reach out at guptaamanthan01[at]gmail[dot]com.